Pages

Wednesday, June 30, 2010

Stage 2 ...and a half...planning the new kitchen layout.

When we started this renovation, my clients were sure that we would not be able to change the current U shape layout of the kitchen. This is where the magic of using AutoCad comes in...along with a very creative mind.
By drawing everything to scale and moving cabinets around, all the while keeping the mechanicals in the same place, I was able to come up with a kitchen cabinet layout that included an island. 

The placement of the island allows the homeowner to see into the living room/dining room and also socialize with anyone sitting in the kitchen...and of course, Everyone knows that the best part of any great party is hanging out in the kitchen! And my clients are delighted because they love having people over!

So here are the colour renderings for the new kitchen layout. Hope you like them.


Smiles,

Chrisse

Saturday, June 26, 2010

Stage 2 -Design renovation of 1950's home- Demolition


The first stage of the renovation for this 50's home is well underway. We had to install a new ceiling so added a deep and fabulous plaster cove molding all around the room. The studs for the ceiling were uneven, so we had to apply 5 coats of plaster to get the ceiling even. Whew!
The fireplace frame is built and the ribbon fireplace is installed. All that's left to do is install the ledgestone slate on the surround. This is a surprising edgy modern element the clients and I are really looking forward to seeing completed.


This fireplace will give off lots of heat in the dead of winter and on those cool summer nights, the glowing crystals on the bottom of the firebox will provide a lovely soft light with LED lights.

Full 3D colour renderings were created to help the clients "see" my vision for their home renovation. This program is by Chief Architect & I am really happy that I decided to use it. Learning how to use it has been relatively easy and fun, so much so that I find myself "playing" with the software at night rather than having a good night sleep.  My clients are ecstatic with the results and are impatiently waiting to see my vision completed. I love finding & realizing my client's vision into reality!


These are the renderings I created for the livingroom, ensuite bathroom, the family room.


Next is the kitchen. The 3D design concepts are nearly ready and I'll be posting them in the next few days.  Oh....and we're going shopping for furniture. The custom designed sofa and loveseat have been ordered!  I can't wait to share a picture of them with you when they will be ready.

Enjoy...and please feel to send me your comments.

Talk to you soon!

Love,
Chrisse


Friday, May 7, 2010

Staged condo SOLD in 2 Days for $26,000. more than asking!


Last week I was hired to stage a condo that was about 30yrs old and was being placed on the market for the first time. This condo belonged to a new business acquaintance's mother. It was crowded and a little tired.


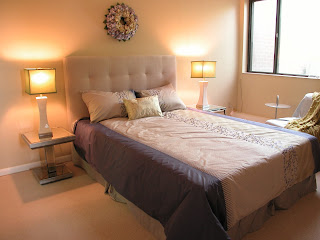
I had the condo repainted with fresh up-to-date colours, removed most of the existing furniture, rented a few pieces that we were missing, added some soft drapes, repaired the bathroom plumbing, replaced the sink & taps with new ones, and suggested that my client replace the old stove with a new one. Why, you may ask?  The answer is simply that the fridge & dishwasher were nearly new and were stainless steel, and here was this old yellow stove. My client is a very smart lady. She owns a successful business and... she hired me didn't she! So... she replaced the stove with a new stainless steel one.

The condo was placed on the market on Wednesday this week and today it was SOLD for $26,000.00 over asking!  Two days on the market, $3,500.00 to get the condo shipshape ready and her pay-off is an extra $26,000.00. Not a bad investment.

Here is a link to my Facebook page to check out the pictures.  Be sure to show that you "like" what you see and please help me reach 200 fans.
Thanks!
Chrisse
http://www.facebook.com/#!/album.php?aid=172621&id=147422028684

Part deux -Pictures & sticky notes-

My clients are in the process of determining what new style of decor they want. This causes a problem for me as I am far more effective when I know what direction to go style wise. Its like a road map: no good having a road map if you don't have an address to go to.
So, armed with dozens of magazines and 2 colors of sticky notes, one for the husband, one for the wife, they have homework to do. I'm giving them a week. What I know will happen is that they will each have many design ideas in common. I'm looking forward to seeing the results...so stay tuned.
Once I know what really appeals to them, I'll be able to come up with something fun & fantastic, with lasting appeal for them. Can't wait!

Tuesday, April 27, 2010

Stage 1 - Release us!- How to renovate a 1950's home.


Release us from this 1970s renovation...please!   That is what my newest clients have asked  me to do.  This is a backsplit home in northwest Toronto built nearly 50 yrs ago, in an enclave of mature trees. The clients bought the house 18yrs ago and haven't done anything to it since they bought it other than get some walls done in faux finishes.
So...here is what we're doing...we're designing & making the living room & dining room combo, more grown up. We'll be adding a gas fireplace, some custom built-ins for storage & display. In the hallway/foyer, we'll  be adding a closet for the hockey stuff. Right now, its all dumped in the living room.  Then we'll totally gut the kitchen & install new cabinets & give a fresh upscale country  feel with personality. Then we'll move on to the washrooms, the family room, the recreation/games room, the studio etc.
Check back regularly on my blog to see the progress as I will be posting pics as we go through all the stages of this home renovation.